Tuesday, November 5, 2024
How to Make a Wooden Utensil Holder: Organize Your Kitchen
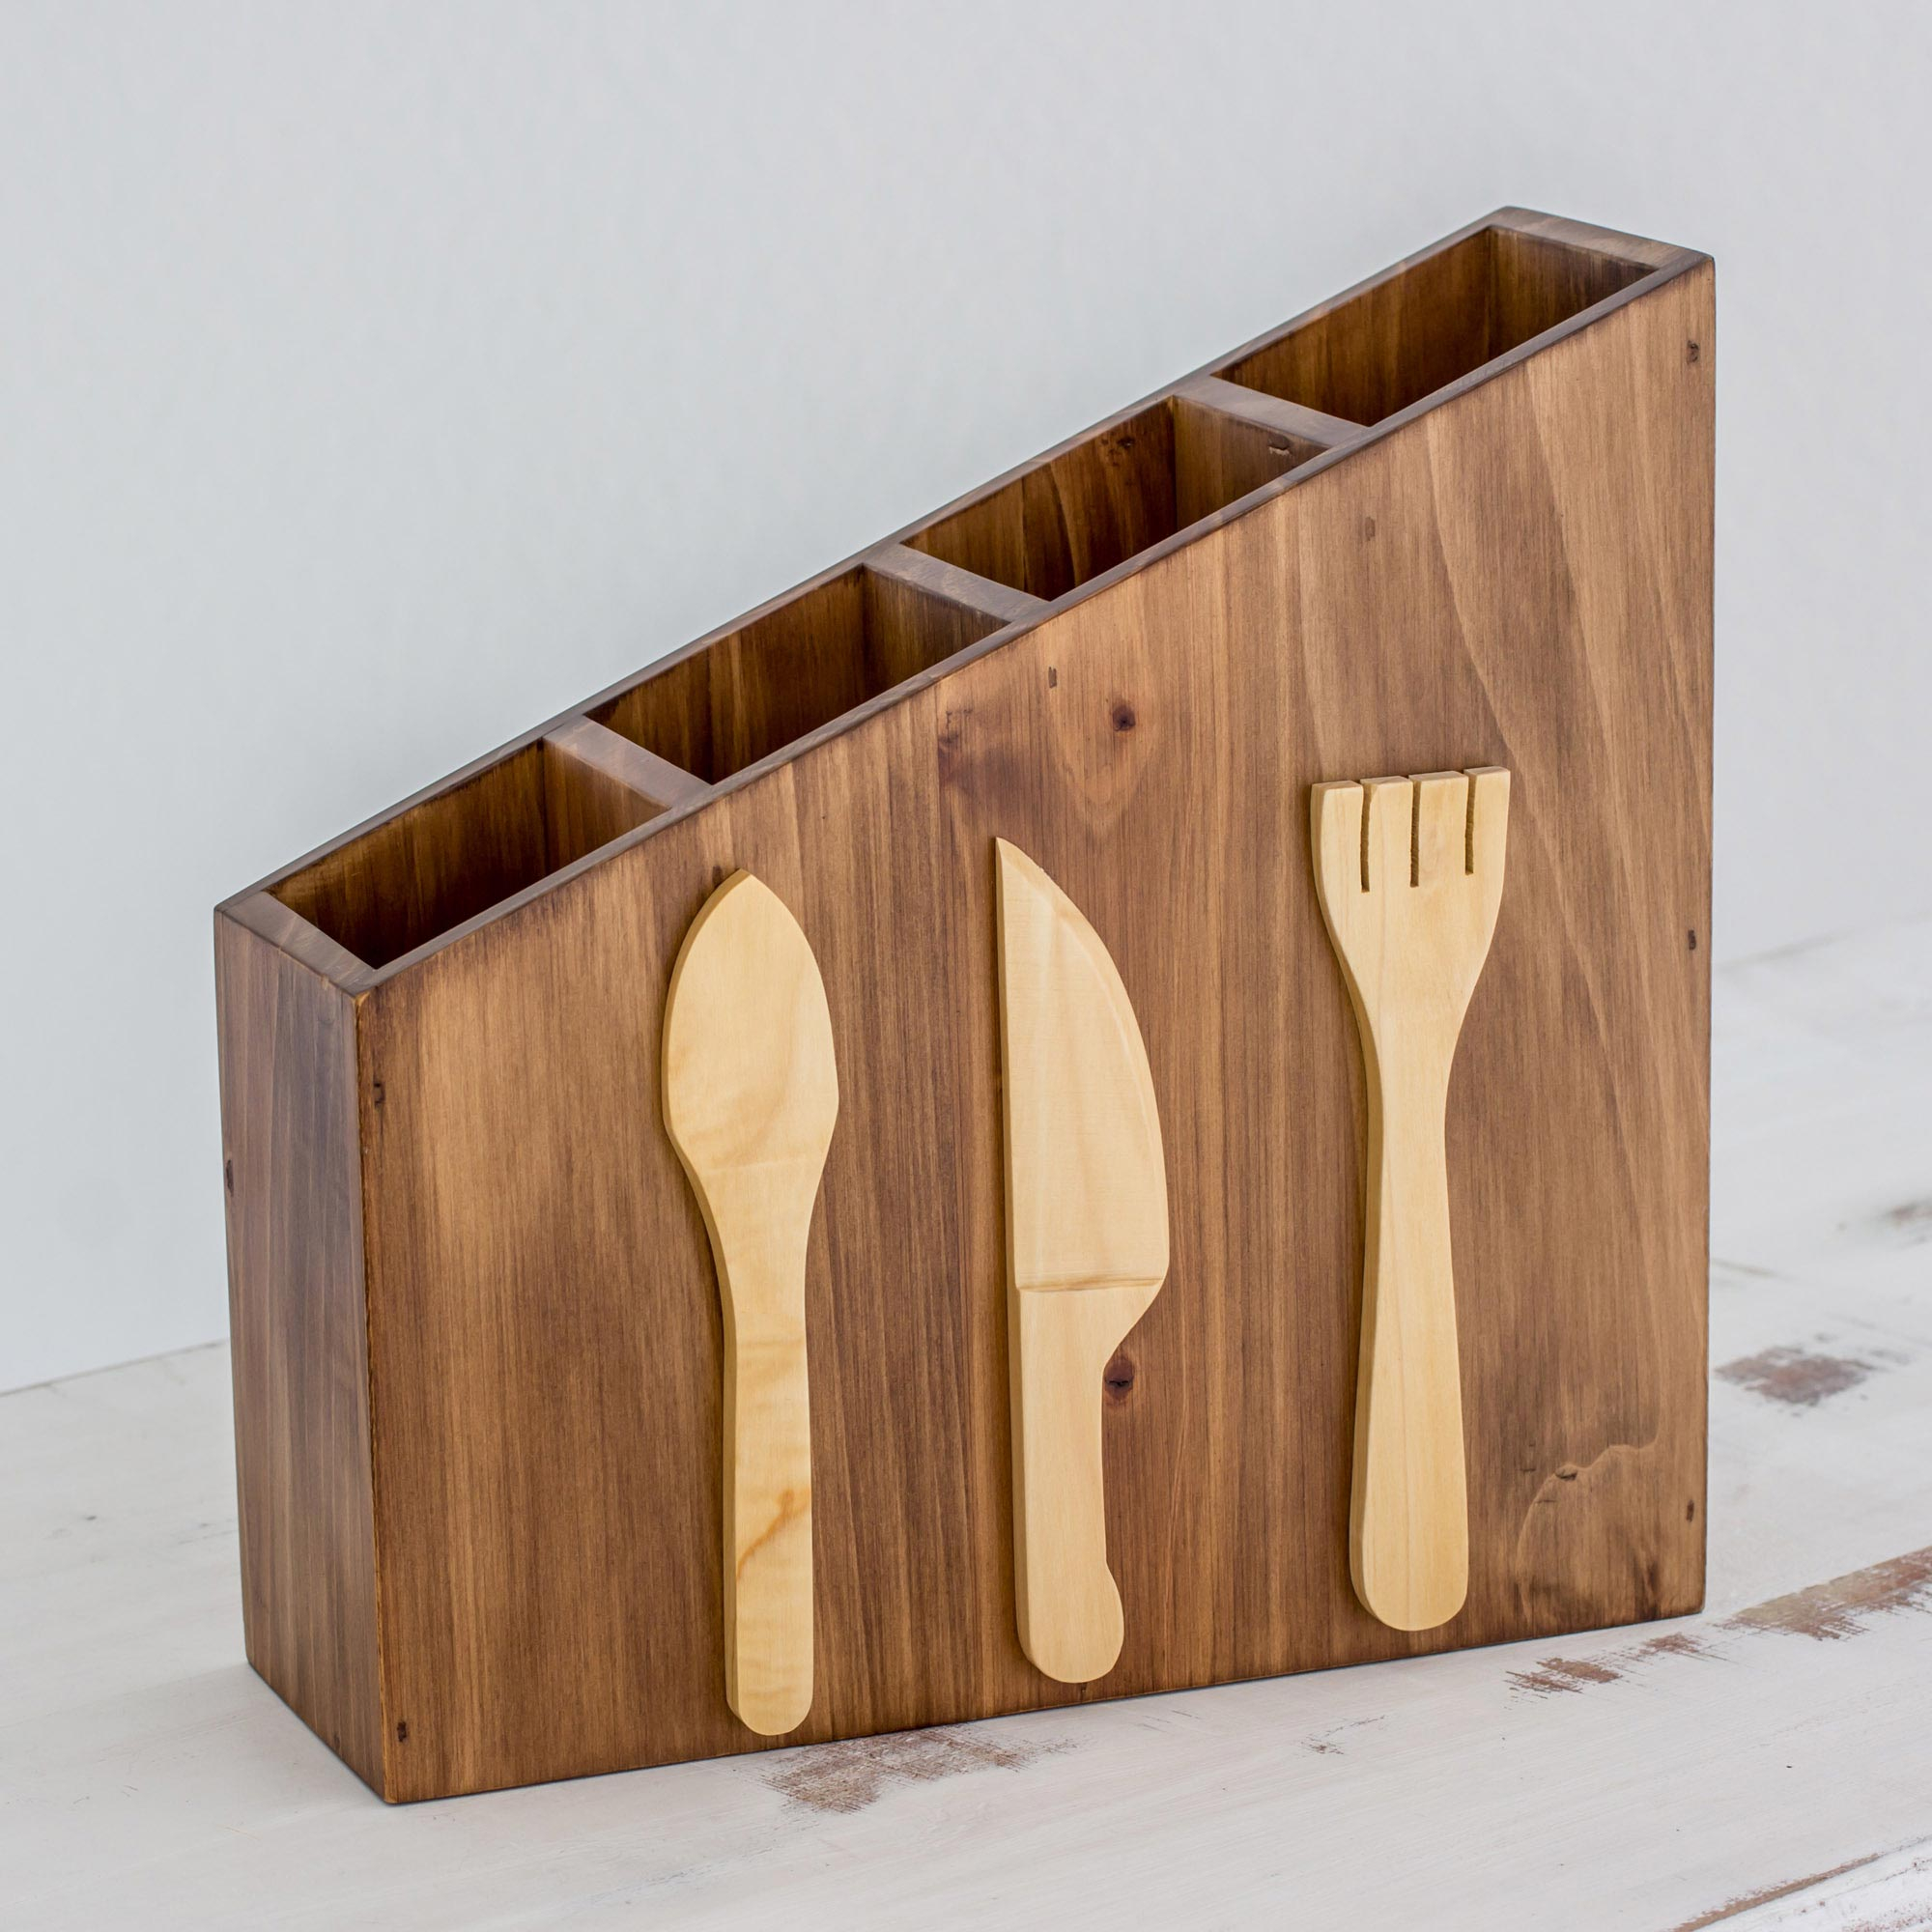

Tired of cluttered kitchen counters? A stylish and functional wooden utensil holder is the perfect solution. Here's how to make one yourself:
Materials:
Wood: Choose a durable hardwood like oak, maple, or walnut. You'll need a piece at least 6" wide, 12" long, and 1" thick.
Wood glue: For a strong and secure bond.
Wood stain or paint (optional): To add color and finish.
Wood sealer (optional): To protect the wood and make it water-resistant.
Saw: To cut the wood to size.
Sandpaper: Various grits for smoothing the wood.
Drill: With a drill bit slightly smaller than the diameter of the dowels.
Dowels: About 1/2" diameter and 6" long, or a smaller size if desired. You'll need at least 4.
Clamps: For securing the wood while gluing.
Measuring tape and pencil: For marking the wood.
Steps:
1. Cut the wood to size: Measure and mark the wood to your desired dimensions for the base of the utensil holder. Using a saw, cut the wood to shape.
2. Sand the wood: Sand the wood with coarse-grit sandpaper to remove any rough edges and splinters. Gradually move to finer grit sandpaper to achieve a smooth finish.
3. Mark and drill dowel holes: Decide where you want to place your dowels for holding utensils. Mark these spots on the wood base with a pencil. Using a drill, carefully drill holes at the marked points, ensuring the holes are slightly smaller than the diameter of the dowels.
4. Assemble the dowels: Place the dowels into the drilled holes. You can choose to secure them with wood glue for extra stability.
5. Finish the wood (optional): Apply wood stain or paint to the base of the utensil holder for a desired color. Allow the stain or paint to dry completely before proceeding.
6. Seal the wood (optional): Apply a wood sealer to protect the wood from water damage and spills. This also enhances the durability and adds a protective layer.
7. Let dry and enjoy! Allow the wood to dry completely before placing your utensils in the holder. You can now enjoy your beautiful and practical wooden utensil holder!
Tips:
Consider the design: You can create different shapes and sizes for your utensil holder based on your preferences and the space available.
Decorate with wood burning: Add a decorative touch by carving or burning designs onto the wood.
Use reclaimed wood: This is a great way to repurpose old wood and create a unique and sustainable holder.
Get creative: Don't be afraid to experiment with different materials and designs.
Making a wooden utensil holder is a fun and rewarding DIY project. With a bit of creativity and some basic woodworking skills, you can create a beautiful and functional piece that will add a touch of warmth and elegance to your kitchen.
Build a Wooden Wine Glass Holder: Elegant Addition to Your Bar
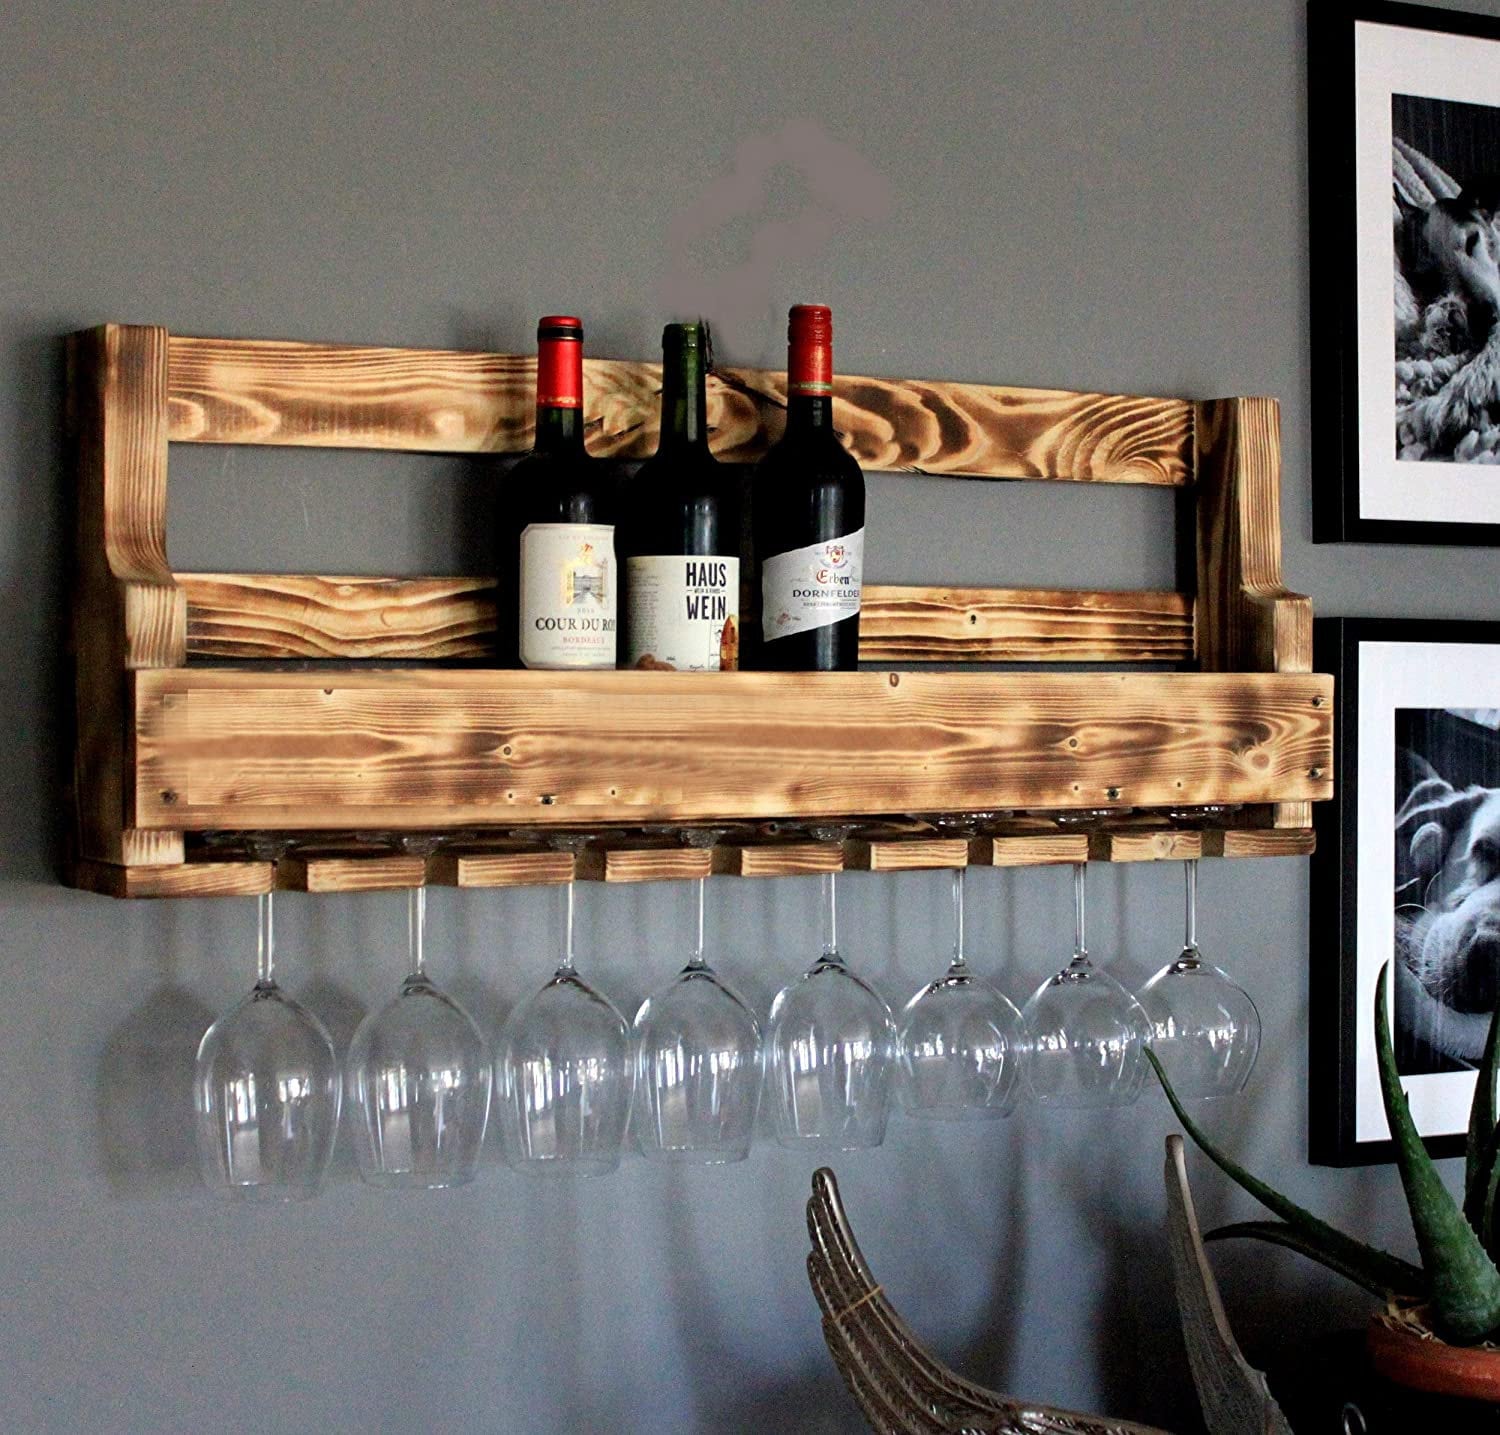

This guide will walk you through building a stylish and functional wooden wine glass holder that will elevate your bar setup.
Materials:
Wood:
1 x 6" (or similar size) piece of hardwood (e.g., oak, maple, walnut) - at least 2 feet long
1/2" thick plywood (or similar) for the base - size depends on your desired holder dimensions
Hardware:
Wood glue
Wood screws (2.5" long or longer)
Wood stain (optional)
Wood finish (optional)
Drill and drill bits (appropriate for screws)
Tools:
Miter saw or circular saw
Measuring tape
Pencil
Jigsaw (optional, for shaping the top)
Sandpaper (various grits)
Clamps
Safety goggles
Dust mask
Steps:
1. Plan your design: Determine the size and shape of your holder. You can create a simple rectangular shape or get more creative with a rounded design.
2. Cut the wood: Using your saw, cut the hardwood to your desired length. For the base, cut a piece of plywood to fit the width of your holder.
3. Shape the top: If desired, use a jigsaw to shape the top of the hardwood piece to create a more elegant look. You can create a rounded, curved, or even a decorative pattern.
4. Mark and drill holes: Measure and mark the positions for the glass holders on the hardwood piece. Drill pilot holes for the screws, ensuring they are deep enough to accommodate the screws without splitting the wood.
5. Assemble the holder:
Apply wood glue to the bottom of the hardwood piece and place it on the plywood base.
Securely clamp the two pieces together until the glue dries.
Once the glue is dry, screw the hardwood piece to the base using the pilot holes you drilled.
6. Sand the holder: Use sandpaper to smooth out any rough edges or imperfections. Start with coarser grit sandpaper and gradually progress to finer grits for a smooth finish.
7. Finish (optional):
Stain the wood to enhance its natural beauty.
Apply a clear finish (e.g., polyurethane) to protect the wood and enhance its shine.
8. Let the finish dry: Allow the stain and finish to dry completely before using your wine glass holder.
Tips:
Experiment with different woods: Use various types of hardwood to create unique and contrasting looks.
Consider adding embellishments: Decorate the holder with decorative hardware, engraved details, or even burned designs for a personalized touch.
Vary the shape: Create different shapes and sizes to hold different types of wine glasses, like stemless or large wine glasses.
Safety Precautions:
Wear safety goggles and a dust mask when using power tools and sanding.
Ensure your work area is clean and well-lit.
Use caution when using sharp tools and always follow the manufacturer's instructions for each tool.
By following this guide, you can create a beautiful and functional wooden wine glass holder that will add a touch of elegance to your bar or dining area. Enjoy!
Create Your Own Wooden Wall Clock: Unique Home Décor
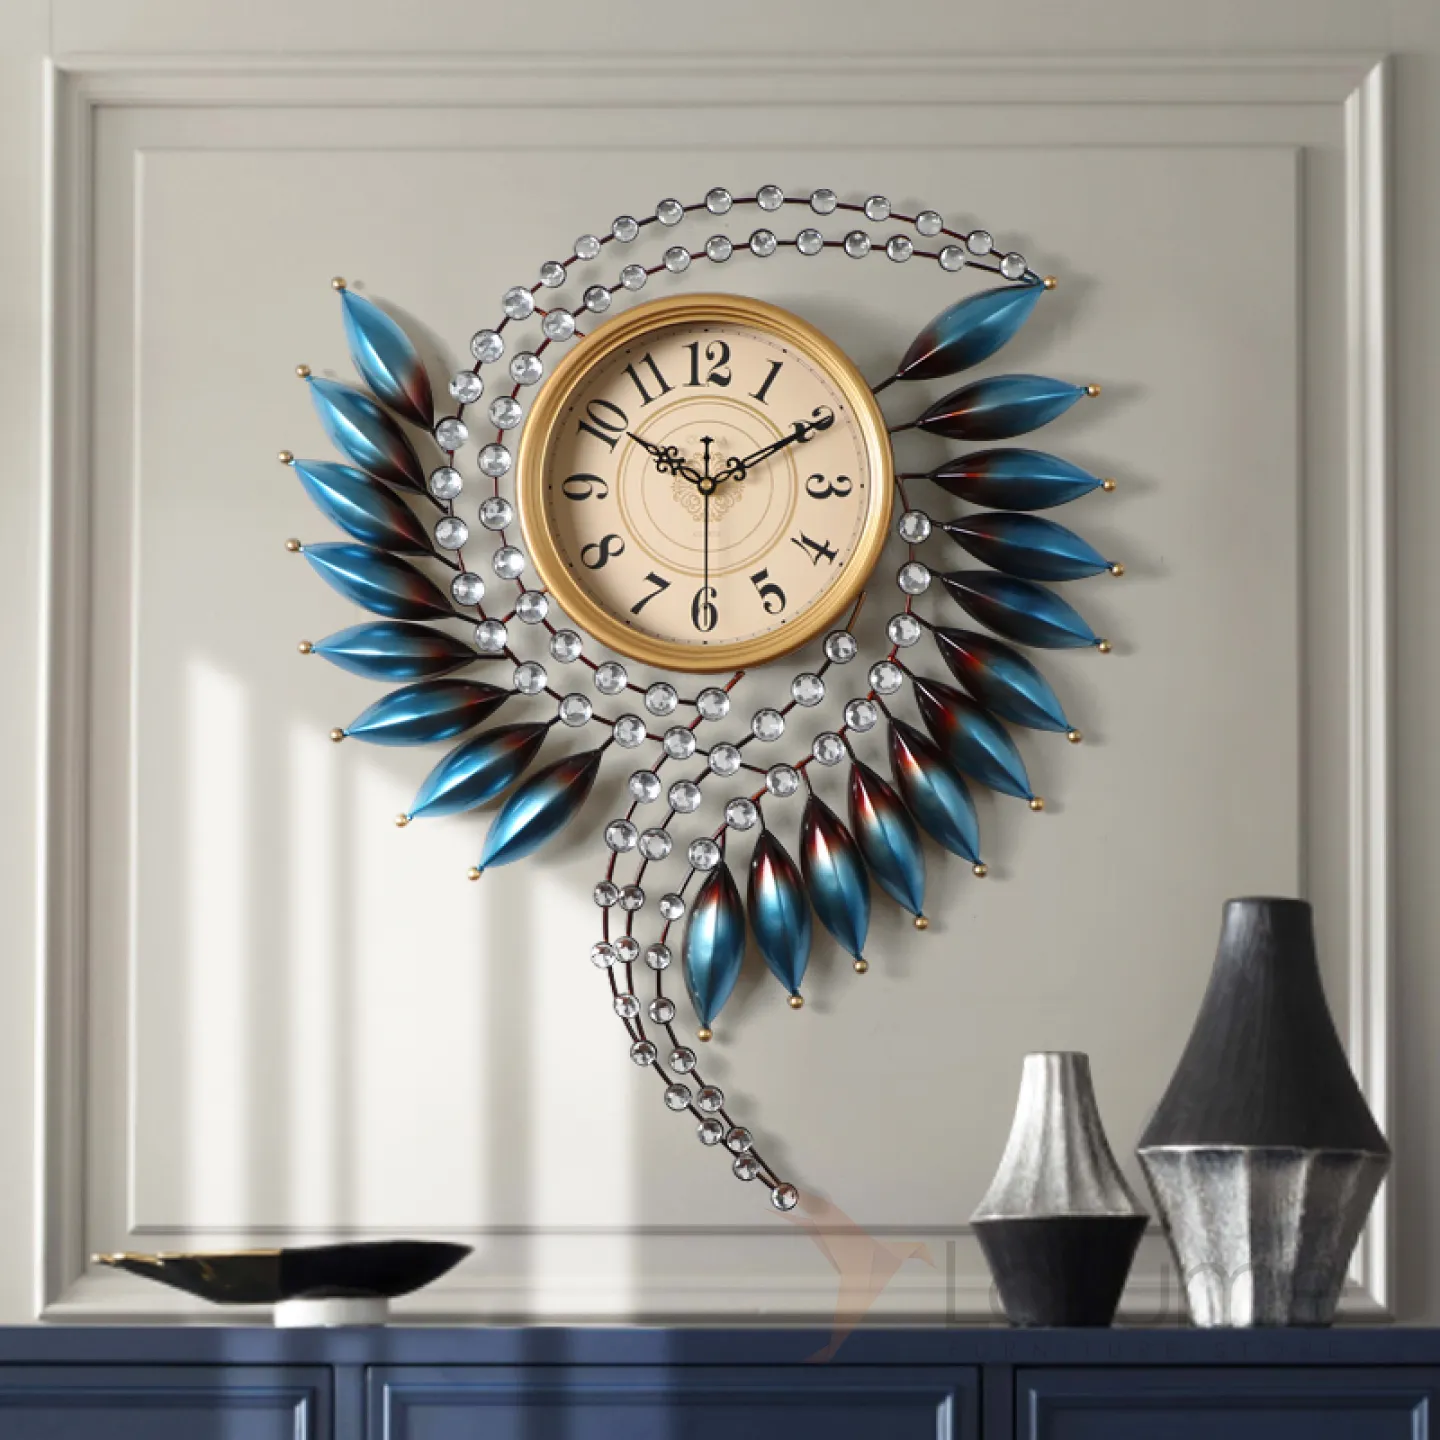

Tired of generic wall clocks? Want to add a personal touch to your home decor? Then this DIY project is for you! Create a stunning, unique wooden wall clock that reflects your style.
Materials:
Wooden base: Choose a circular piece of wood, a salvaged piece of wood with interesting texture, or even a decorative plate.
Clock mechanism: You can find these at craft stores or online.
Clock hands: Choose hands that complement your design.
Sandpaper: To smooth out any rough edges.
Stain/Paint: To personalize your clock.
Brush/sponge: For applying stain/paint.
Clock numbers/markers: Choose from stencils, stickers, or even hand-painted numerals.
Glue/Adhesive: To secure the clock mechanism and numbers.
Drill with a drill bit: To drill holes for the clock mechanism.
Steps:
1. Prepare your wood: Sand down any rough edges and ensure the surface is smooth. If using an unfinished wood, apply a stain or paint to your desired color.
2. Attach the clock mechanism: Carefully read the instructions that come with your clock mechanism. Mark the center of your wooden base and use a drill to create a hole for the mechanism. Secure the clock mechanism to the back of the base with glue or screws.
3. Add clock hands: Align the clock hands with the clock mechanism and secure them according to the instructions.
4. Mark and attach numbers: Use a pencil to lightly mark the placement of the numbers. Choose your preferred method for adding numbers:
Stencils: Use stencils to paint the numbers onto the wood.
Stickers: Apply pre-made clock stickers.
Hand-painted: Use a fine-tipped paintbrush to carefully paint the numbers.
5. Hang your clock: Most clock mechanisms come with a mounting hook or loop for easy hanging.
Unique Design Ideas:
Geometric Shapes: Create a modern, minimalist design using geometric shapes as clock numbers.
Nature Inspired: Incorporate natural elements like leaves, branches, or flowers into your design.
Textured Surfaces: Use reclaimed wood with interesting grain patterns or add texture with decoupage.
Personalized Elements: Add initials, dates, or meaningful symbols to make it truly your own.
Upcycled Materials: Use old CDs, vinyl records, or even a cutting board to create a unique base.
Tips:
Practice on scrap wood: Test out your stain, paint, and numbers on a piece of scrap wood before applying them to your clock base.
Use a ruler: Ensure the numbers are evenly spaced for a polished look.
Secure the clock mechanism tightly: A loose mechanism can affect the clock’s accuracy.
Consider adding a protective coat: Apply a sealant to protect the wood and your design.
This DIY project allows you to unleash your creativity and personalize your space with a truly unique piece of art. Enjoy the process and let your imagination run wild!
DIY Wooden Key Holder: Never Lose Your Keys Again
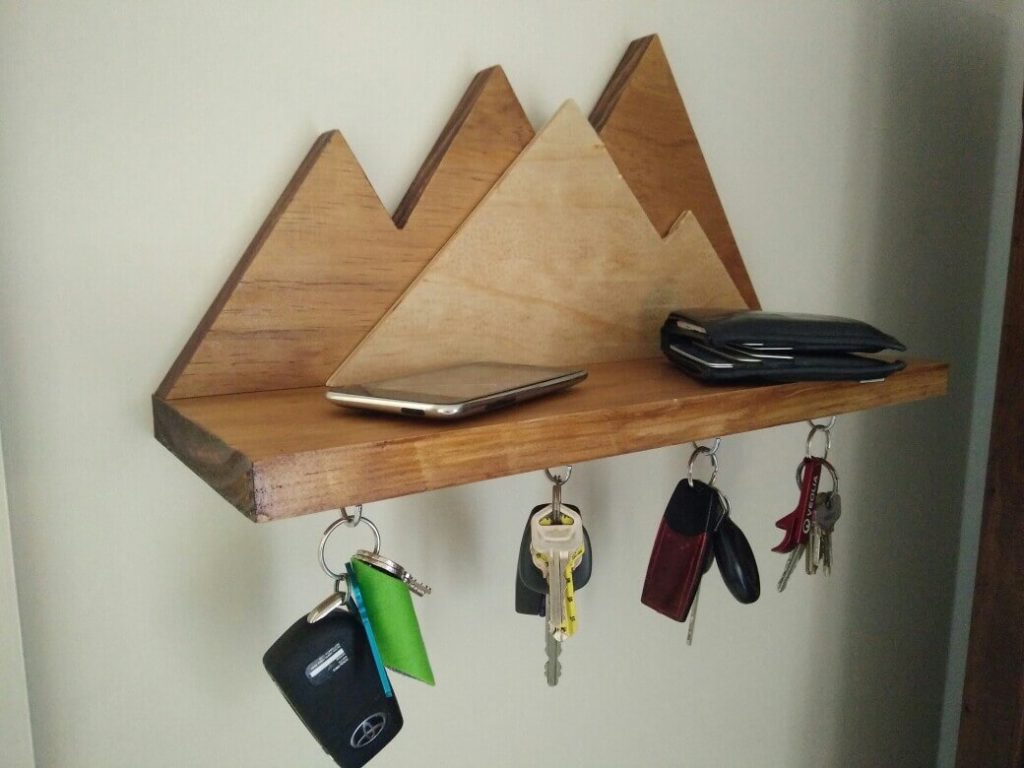

Tired of frantically searching for your keys every morning? A stylish and functional key holder can be the solution! This DIY project lets you personalize your entryway while keeping your keys organized.
Materials:
Wood board: Choose a size and shape you like. You can use reclaimed wood, a cutting board, or even a piece of plywood.
Wooden dowels: Select a size and number based on how many keys you need to hang.
Wood glue: A strong, waterproof adhesive.
Wood stain or paint: To give your key holder your desired look.
Sandpaper: Various grits for smoothing the wood.
Screws: For attaching the dowels to the board.
Drill with drill bits: For drilling pilot holes for the screws.
Measuring tape, pencil, and saw: For cutting the dowels to size and marking your board.
Optional: Hooks, hangers, or other decorative elements.
Instructions:
1. Prepare the wood: Sand your board thoroughly with different grits of sandpaper to achieve a smooth surface. If using reclaimed wood, ensure it’s clean and free from debris.
2. Cut the dowels: Measure and cut your wooden dowels to the desired length. You can use a saw or even a hand saw for this step.
3. Mark the placement: Use a pencil and measuring tape to mark the location of each dowel on the board. Ensure they are evenly spaced and allow ample room for your keys.
4. Drill pilot holes: Before attaching the dowels, drill pilot holes slightly smaller than the screws you will use. This prevents the wood from splitting.
5. Attach the dowels: Apply a generous amount of wood glue to the ends of the dowels and insert them into the marked positions on the board. Use screws to secure the dowels firmly.
6. Sand and finish: Once the glue is dry, sand the board again to ensure a smooth finish. Apply wood stain or paint, depending on your preference.
7. Add decorative elements: If desired, attach hooks, hangers, or other decorative elements to your key holder. You can use small knobs or even repurposed items for a unique look.
8. Hang your key holder: Mount your completed key holder to the wall using screws or nails.
Tips and Variations:
Get creative: Experiment with different shapes, sizes, and wood types to create a unique key holder.
Add a storage compartment: Use a small box or a shelf attached to the back of the board for storing other small items like mail or keys.
Customize with your initials: Use a wood burning tool to add your initials or a personalized message.
Use a different mounting method: Instead of screws, you can use Command Strips or adhesive hooks for a removable option.
Upcycle: Use an old frame, a piece of driftwood, or a repurposed object for a more rustic and eco-friendly project.
Now you have a beautiful and functional key holder that will keep your keys organized and within reach!
How to Make a Wooden Serving Tray: Perfect for Entertaining


You'll Need:
Materials:
Wood:
Hardwood: Maple, walnut, cherry, or oak are good choices for durability and beauty.
Softwood: Pine, cedar, or fir are less expensive but less durable.
Plywood: Can be used for a less expensive option, but choose a high-quality plywood for strength.
Wood glue
Wood screws (if using plywood)
Finishing supplies:
Sandpaper: Grit 80, 120, 220
Wood stain (optional)
Wood finish: Polyurethane, varnish, or oil
Handles:
Wooden handles: Available at craft stores in various styles
Leather straps: Adds a rustic touch
Measuring tape
Pencil
Jigsaw or circular saw (if cutting your own wood)
Drill with a drill bit
Clamps
Safety glasses
Dust mask
Gloves
Instructions:
1. Design and Measure:
Decide on your tray's dimensions. Consider the size you need for your serving needs and the space you have to store it.
Sketch out your design: You can choose a simple rectangular shape or get creative with rounded corners or a more elaborate design.
Measure and mark your wood: Use a pencil and a ruler to transfer your design onto the wood.
2. Cut the Tray:
Cut the wood: If you're using a pre-cut piece, skip this step. If not, carefully cut the wood using a jigsaw or circular saw, following your markings.
Sand the edges: Use sandpaper to smooth any rough edges and to prepare the surface for finishing.
3. (Optional) Create a Raised Edge:
Cut strips of wood: If you want a raised edge on your tray, cut strips of wood that are the desired height.
Attach the edge strips: Use wood glue and clamps to attach the strips to the perimeter of the tray. You can use wood screws to secure the strips for added strength.
4. Apply Wood Stain (Optional):
Choose your stain: Consider the color you want to achieve and the type of wood you're using.
Apply the stain evenly: Use a brush or cloth to apply the stain according to the manufacturer's instructions.
Allow the stain to dry: Let the stain dry completely before moving on.
5. Attach the Handles:
Measure and mark the handle placement: Decide where you want the handles to be and mark the spots on the tray.
Drill pilot holes: Drill pilot holes for the handles.
Attach the handles: Attach the handles using wood screws or glue, depending on the type of handle.
If using leather straps: Punch holes in the tray and thread the straps through.
6. Apply a Finishing Coat:
Sand the tray: Use sandpaper to smooth any rough spots and to prepare the surface for the finish.
Choose your finish: Polyurethane, varnish, or oil can all be used to protect the wood and enhance its natural beauty.
Apply the finish: Follow the manufacturer's instructions for application. Multiple coats may be needed for a durable finish.
7. Let the Finish Dry:
Allow the finish to dry completely: This may take several hours or even days, depending on the type of finish you use.
8. Enjoy Your New Serving Tray!
Tips:
Use safety gear: Wear safety glasses, gloves, and a dust mask when working with wood.
Use clamps for a strong bond: Clamping the pieces together while the glue dries ensures a strong bond.
Sand carefully: Don't sand too aggressively, especially if you're using a softwood.
Experiment with different finishes: Try different wood stains and finishes to find the look you prefer.
Personalize your tray: Add decorative details like inlays, stencils, or a personalized engraving.
With a little time and effort, you can create a beautiful and functional serving tray that will be the perfect addition to your next gathering!
Build a Wooden Bookshelf: Showcase Your Book Collection
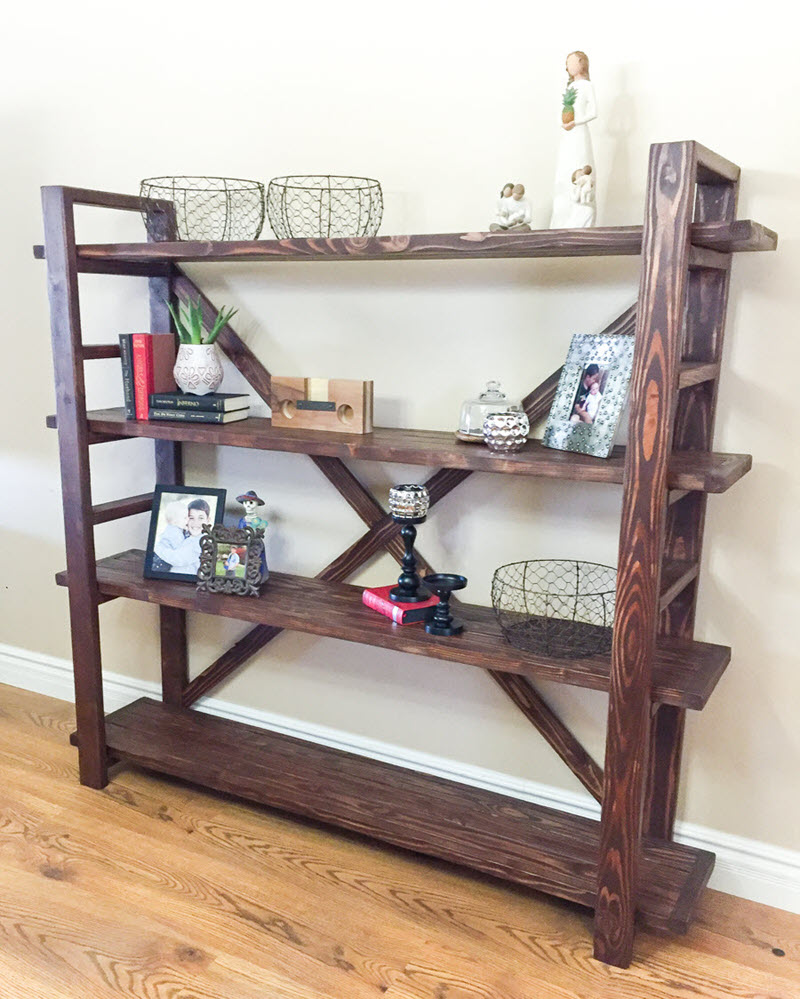

This guide will walk you through the process of building a simple yet elegant wooden bookshelf to showcase your book collection.
Materials:
Wood:
Shelves: 3/4" thick plywood or solid wood boards (consider using walnut, oak, or maple for a more luxurious look)
Sides: 1x4" or 1x6" lumber (depending on desired depth)
Top and Bottom: 1x6" or 1x8" lumber (for a sturdy base)
Back: 1/4" plywood or thin beadboard (optional)
Fasteners:
Wood glue
1 1/4" or 1 1/2" wood screws
Finish nails (optional)
Hardware:
Shelf supports (metal brackets or wooden shelf pins)
Corner braces (optional)
Finish:
Wood stain (optional)
Wood sealant (optional)
Tools:
Tape measure
Pencil
Circular saw or miter saw
Drill
Screwdriver
Sander
Clamps
Level
Hammer
Steps:
1. Design & Measurements:
Decide on the size and style: Determine the length, width, and height of the bookshelf. Consider how much space you have and the size of your book collection.
Sketch a plan: Draw a simple diagram outlining the dimensions of the shelf, the number of shelves, and the overall construction. This will help you visualize the final product and ensure you cut the right amount of wood.
2. Cutting the Wood:
Cut the sides: Using a circular saw or miter saw, cut two pieces of wood to the desired height of your bookshelf.
Cut the shelves: Cut the shelves to the desired length. You will need to cut one shelf for each level you want in your bookshelf.
Cut the top and bottom: Cut the top and bottom pieces of wood to the desired length.
Cut the back (optional): If you're adding a back, cut a piece of plywood or beadboard to fit the dimensions of the bookshelf.
3. Assembly:
Attach the sides: Lay the bottom piece of wood flat on a work surface. Use wood glue and screws to attach the sides to the bottom piece.
Attach the shelves: Use shelf supports or shelf pins to attach the shelves to the sides. Ensure each shelf is level and securely attached.
Attach the top: Use wood glue and screws to attach the top piece to the sides and the shelves.
Attach the back (optional): If you're adding a back, use finish nails or staples to attach it to the sides and shelves.
4. Finishing Touches:
Sand: Sand the entire bookshelf with progressively finer grits of sandpaper to smooth out any rough edges and create a smooth finish.
Stain (optional): Apply a wood stain to enhance the natural color of the wood or give it a custom color.
Seal (optional): Apply a sealant to protect the wood from scratches, moisture, and UV damage.
Corner braces (optional): Attach corner braces for extra stability, especially for large or heavy bookshelves.
Tips:
Pre-drill holes: Before screwing into the wood, pre-drill holes slightly smaller than the screw diameter to prevent wood from splitting.
Use clamps: Clamp the pieces of wood together while using glue and screws to ensure a strong bond.
Double-check measurements: Ensure all cuts are made precisely to ensure a perfect fit.
Consider shelf depth: Choose a shelf depth that accommodates your book collection and provides enough space for larger volumes.
Add a personal touch: Incorporate decorative details such as molding, trim, or unique hardware to make your bookshelf unique.
Enjoy Your New Bookshelf:
Once your bookshelf is complete, arrange your books and admire your newly built and personalized display! Remember, this is just a basic guide. Feel free to customize the design and materials to create a bookshelf that perfectly fits your needs and style.
Make Your Own Wooden Wall Art: Personalized Décor


Introduction:
Give your home a unique touch with personalized wooden wall art! This DIY project is perfect for beginners and seasoned crafters alike. Get creative and let your imagination run wild with this easy-to-follow guide.
Materials You'll Need:
Wooden board: Choose a size and shape that suits your project (e.g., reclaimed wood, plywood, or even an old door)
Sandpaper: Use different grits (fine, medium, coarse) for smoothing and finishing
Wood stain or paint: Select colors that complement your décor
Paintbrushes or a roller: For applying stain or paint
Optional:
Stencils: For intricate designs
Embellishments: Beads, buttons, fabric scraps, etc.
Hardware: Hooks, sawtooth hangers
Protective sealant: Polyurethane or varnish
Step-by-Step Instructions:
1. Prepare the Wood:
Clean: Wipe the board with a damp cloth to remove dust and debris.
Sand: Sand the surface using coarse sandpaper to remove any rough edges. Gradually move to finer sandpaper for a smooth finish.
2. Design and Planning:
Brainstorm: Think about what you want to create. Do you want a simple design, a quote, or a more intricate artwork?
Sketch: Draw your design on paper to visualize the final outcome.
Transfer: If you're using a stencil, use a pencil to trace the design onto the wood. Otherwise, freehand your design directly on the wood.
3. Apply Stain or Paint:
Protect: Use painter's tape to mask areas you don't want to stain or paint.
Apply: Use a brush or roller to apply stain or paint according to the manufacturer's instructions.
Multiple Layers: If needed, apply multiple layers of stain or paint for a richer color and better coverage.
4. Add Embellishments (Optional):
Glue: Use wood glue or a strong adhesive to attach embellishments like beads, buttons, or fabric scraps to the wood.
Placement: Experiment with different arrangements until you're happy with the look.
5. Finishing Touches:
Sand: Lightly sand the surface to smooth out any rough edges.
Sealant: Apply a sealant like polyurethane or varnish to protect your artwork from wear and tear.
6. Hang Your Artwork:
Hardware: Attach hooks or sawtooth hangers to the back of your artwork.
Placement: Choose a suitable spot on your wall and hang your masterpiece!
Tips & Tricks:
Reclaimed Wood: Use salvaged or reclaimed wood for a unique and eco-friendly touch.
Natural Textures: Embrace the natural grain of the wood by using a clear sealant or a light stain.
Geometric Shapes: Create modern wall art using simple geometric shapes.
Personalized Quotes: Add a personal touch by incorporating quotes that resonate with you.
Inspiration:
Pinterest: Find countless DIY wooden wall art ideas on Pinterest.
Online Tutorials: Explore YouTube and other online platforms for step-by-step guides.
Your Own Style: Don't be afraid to experiment and personalize your artwork to reflect your unique style.
Enjoy the Process:
Making your own wooden wall art is a rewarding experience. Take your time, experiment with different techniques, and personalize your artwork to make it truly special. Happy crafting!
DIY Wooden Headboard: A Stylish Addition to Your Bedroom


Want to upgrade your bedroom without breaking the bank? Building a DIY wooden headboard is a fantastic way to add a touch of personalized style and character to your space. This project is surprisingly achievable, even for beginners, and offers a chance to unleash your creativity.
Here's what you'll need:
Materials:
Wood: Choose your wood based on your desired style and budget. Some popular options include:
Pine: Affordable and easy to work with.
Plywood: Strong and versatile, ideal for creating unique shapes.
Reclaimed wood: Adds a rustic charm and is eco-friendly.
Hardware:
Wood screws: For attaching the headboard to the bed frame.
Wood glue: For extra strength and stability.
Sandpaper: For smoothing rough edges and creating a polished finish.
Finishing supplies:
Stain or paint: To achieve your desired color and finish.
Primer: To help the paint adhere better.
Polyurethane: For protecting the wood from scratches and spills.
Tools:
Saw: To cut the wood to your desired dimensions.
Drill: For drilling pilot holes for screws.
Screwdriver: For attaching hardware.
Clamps: To hold pieces together while gluing.
Measuring tape: For accurate measurements.
Level: To ensure the headboard is straight.
Instructions:
1. Plan and design: Decide on the size, shape, and style of your headboard. Sketch out a plan and consider the dimensions of your bed frame.
2. Cut the wood: Use a saw to cut the wood to your desired size. Be precise and wear safety glasses.
3. Assemble the headboard: Depending on your design, you might need to join multiple pieces of wood together using wood glue and clamps. Ensure all the pieces are secure and allow the glue to dry completely.
4. Sand the headboard: Sand down any rough edges and imperfections. Start with coarse sandpaper and gradually progress to finer grit for a smooth finish.
5. Apply primer (optional): A primer helps the paint adhere better and creates a more even finish.
6. Stain or paint the headboard: Choose your desired color and finish. Use a brush, roller, or spray gun to apply the stain or paint evenly.
7. Apply polyurethane (optional): Polyurethane acts as a protective layer and adds a glossy or satin finish.
8. Attach the headboard to your bed frame: Measure and mark the position for attaching the headboard. Use wood screws and pilot holes to secure it firmly to the bed frame.
Tips:
Safety first: Wear safety glasses, gloves, and a dust mask when cutting, sanding, or applying finishes.
Practice on scrap wood: Before working on your final headboard, practice your cutting and finishing techniques on scrap wood.
Measure twice, cut once: Ensure all your measurements are accurate before cutting the wood.
Use a level: Make sure the headboard is level when attaching it to the bed frame.
Let the paint dry completely: Allow sufficient drying time for the paint and polyurethane before using the headboard.
Add your own flair: Get creative and personalize your headboard with details like molding, decorative hardware, or custom artwork.
Enjoy your stylish and personalized DIY wooden headboard!
How to Build a Wooden Planter Box for Your Garden


Materials:
Lumber: Choose a rot-resistant wood like cedar, redwood, or pressure-treated pine. You'll need:
4 pieces for the sides (length = desired planter length, width = desired planter height)
2 pieces for the bottom (length = desired planter length, width = desired planter width)
2 pieces for the top (length = desired planter length, width = desired planter width)
Screws: Wood screws long enough to go through all pieces of wood.
Wood glue: For added strength.
Stain or paint: (Optional) for protection and aesthetics.
Measuring tape
Saw (circular saw or handsaw)
Drill with drill bits
Level
Clamps (optional)
Safety goggles
Work gloves
Instructions:
1. Design and Measure: Determine the desired dimensions of your planter box. Remember to factor in the thickness of the wood when calculating the final dimensions.
2. Cut the Wood: Use your saw to cut the lumber to the exact sizes you calculated. Be sure to make precise, clean cuts for a professional finish.
3. Assemble the Sides: Lay the four side pieces flat on a level surface. Apply a thin layer of wood glue to the edges of the two shorter sides. Place the longer side pieces on top of the shorter sides, ensuring the corners are perfectly aligned. Secure them with screws, making sure to countersink the screws to avoid them sticking out.
4. Add the Bottom: Apply glue to the edges of the bottom pieces. Place them inside the assembled sides, ensuring they fit snugly against the bottom of the sides. Secure the bottom with screws, countersinking them.
5. Add the Top: Apply glue to the edges of the top pieces. Place them on top of the assembled sides, making sure they are flush with the top of the side pieces. Secure the top with screws, countersinking them.
6. Finishing Touches:
Sand the edges: This will help prevent splinters and create a smoother finish.
Apply stain or paint: If desired, stain or paint the planter box for protection and aesthetics. Let it dry completely.
7. Add Drainage: Drill several drainage holes into the bottom of the planter box to prevent waterlogging.
8. Fill with Soil: Add your desired potting soil and plant your favorite flowers or vegetables.
Tips:
Consider using thicker lumber for larger planter boxes.
For added stability, use corner brackets or braces.
Use exterior-grade wood or paint for outdoor use.
If you are unsure of your skills, consider starting with a smaller planter box.
Enjoy your new, handcrafted wooden planter box!
DIY Wooden Desk Organizer: Keep Your Workspace Tidy


A cluttered desk can easily lead to a cluttered mind. A stylish and functional desk organizer can be a game-changer for productivity and organization. Here’s a guide to building your own wooden desk organizer, adding a personal touch and creating a workspace you'll love:
Materials:
Wood: Choose your favorite wood type, like pine, plywood, or reclaimed wood.
Wood glue: For secure bonding.
Screws or nails: For extra stability.
Sandpaper: Various grits for smoothing surfaces.
Wood stain or paint: To personalize your organizer.
Protective finish: Polyurethane or wax for durability and water resistance.
Measuring tape: For precise measurements.
Saw: For cutting wood (table saw, circular saw, or hand saw).
Drill: For pilot holes and attaching screws.
Clamps: For secure joints during assembly.
Optional:
Hardware: Drawer slides, hinges, decorative handles.
Felt pads: To protect your desk surface.
Design Ideas:
Classic Box: Simple and versatile, this organizer can hold pens, pencils, paper clips, and more.
Multi-Level Organizer: Utilize different heights for better separation of items.
Drawer Organizer: Create drawers for small items like paperclips, thumbtacks, or even small tools.
Vertical File Holder: Add a compartment for storing papers or folders.
Combination Organizer: Combine features like drawers, shelves, and compartments for a versatile solution.
Instructions:
1. Planning and Design: Sketch out your desired organizer, including dimensions and compartments.
2. Cutting: Measure and cut the wood pieces according to your design.
3. Assembling:
Join pieces: Use wood glue and clamps to securely attach the pieces, ensuring a tight fit.
Reinforce: Use screws or nails for added stability, especially for larger organizers.
4. Sanding: Smooth all edges and surfaces for a polished finish. Start with coarser grit sandpaper and gradually progress to finer grit for a smooth surface.
5. Finishing:
Staining: Apply wood stain according to the manufacturer's instructions for a natural and warm look.
Painting: Choose your favorite paint color for a personalized touch.
Protective finish: Apply polyurethane or wax for durability and water resistance.
6. Optional:
Hardware: Install drawer slides, hinges, and decorative handles to add functionality and style.
Felt pads: Attach felt pads to the bottom of your organizer to protect your desk surface.
7. Enjoy: Place your newly crafted wooden desk organizer on your workspace and enjoy the benefits of a tidy and organized desk.
Tips:
Consider the size and shape of your desk. Choose a design that fits comfortably without crowding your workspace.
Think about your specific needs. What items do you want to organize?
Use high-quality materials and tools. This ensures durability and longevity for your organizer.
Personalize your organizer. Add your own touch by using unique wood types, paints, or decorative elements.
Building your own wooden desk organizer is a rewarding experience. Not only will you create a personalized and functional piece of furniture, but you'll also enjoy the satisfaction of making something with your own hands. Embrace the DIY spirit and transform your workspace into a haven of productivity and style.
How to Make a Wooden Coat Rack: A Chic Home Accessory


Here's a step-by-step guide on how to make a stylish wooden coat rack for your home:
Materials:
Wood: Choose a sturdy wood like oak, maple, pine, or walnut. You'll need:
Two pieces of wood for the side panels (approximately 1.5 inches thick, 12 inches wide, and 30 inches tall)
One piece of wood for the top rail (approximately 1.5 inches thick, 30 inches long, and 3-4 inches wide)
Several pieces of wood for the coat hooks (approximately 1.5 inches thick, 3-4 inches long, and 1-2 inches wide)
Wood glue
Wood screws
Sandpaper (various grits)
Wood stain or paint (optional)
Finish (optional): Polyurethane, wax, or oil
Measuring tape
Pencil
Circular saw or jigsaw
Drill with drill bits
Clamps
Safety goggles
Instructions:
1. Cut the wood: Use a circular saw or jigsaw to cut the wood to the desired dimensions. Ensure your cuts are precise.
2. Prepare the side panels: Sand the side panels to create a smooth surface. This is important for a professional finish.
3. Attach the top rail:
Place the top rail on top of the side panels, centered and flush with the top edge.
Secure the top rail to the side panels using wood glue and wood screws.
Use clamps to hold everything in place while the glue dries.
4. Create the coat hooks:
Cut the wood for the coat hooks into desired lengths.
Sand the hooks smooth and round the edges for safety and a finished look.
If you desire unique hooks, experiment with different shapes by cutting the wood into rounded or angular forms.
5. Attach the hooks:
Decide on the spacing for your hooks (approximately 6-8 inches apart).
Mark the locations on the side panels where you want to place the hooks.
Drill pilot holes in the side panels for the hooks.
Attach the hooks to the side panels using wood screws.
6. Finishing touches:
Sanding: Sand the entire coat rack to remove any rough edges or imperfections.
Staining or painting: Apply a wood stain or paint to the rack to create your desired look. Use multiple coats for a deeper color or a more durable finish.
Sealing: If desired, apply a protective finish like polyurethane, wax, or oil to protect the wood from scratches and moisture.
Customization Tips:
Unique hooks: Explore different shapes for your hooks. You can use a jigsaw to create rounded, squared, or even animal-shaped hooks.
Add a shelf: For additional functionality, add a shelf to the bottom of the coat rack. This is a great place to store hats, scarves, or other accessories.
Decorative details: Enhance your coat rack's aesthetic with decorative elements. You can add decorative wood molding, engraved details, or even a custom-made sign.
Personal touch: Express your creativity by incorporating personal touches. For example, you can paint the rack in your favorite color, use wood with interesting grain patterns, or add embellishments like knobs or decorative hardware.
Safety Precautions:
Always wear safety goggles when using power tools.
Use caution when handling sharp tools and power equipment.
Ensure your work area is well-lit and free of clutter.
By following these steps, you can create a stunning and practical wooden coat rack that adds a touch of elegance and charm to your home. Embrace your creativity and customize your project to match your style and personality.